")
📋 All About Form Settings
Form settings are a key feature in Take5™ Connect, allowing you to customize forms, notifications, and recurring schedules. This guide will walk you through all the form settings options available and how to configure them effectively. 👇
Step 1: 🔑 Access Form Settings
1. In the Form tab, select Form Templates and click Add Form then navigate to Form Builder tab
2. After creating your form, navigate to the Form Settings tab by clicking the next tab to the right.
3. From here, you can fill in the name, description, and type of form (e.g., Site Induction or standard form).

Step 2: ⚙️ Configure Form Settings
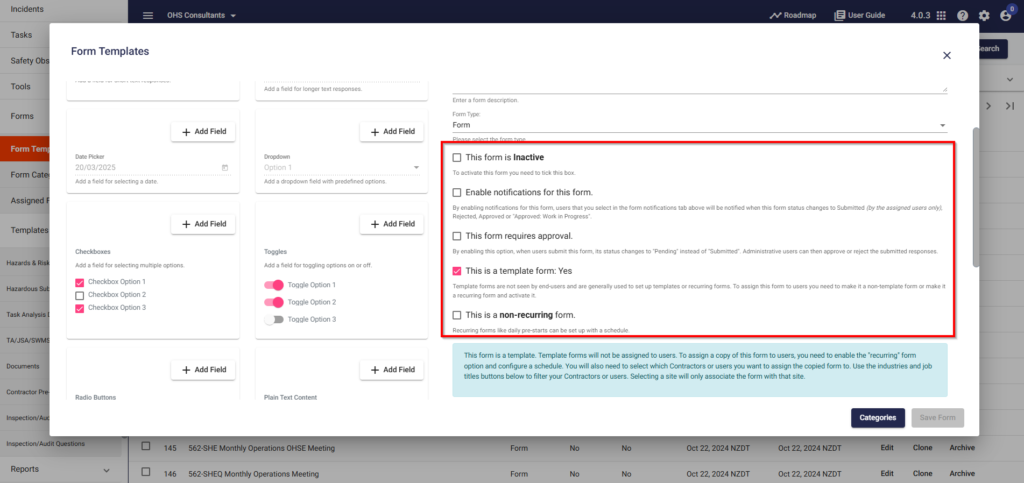
Still in the Form Settings tab, you will find the following options:
- Active or Inactive: Toggle the form to make it either active or inactive. Active forms can be submitted, while inactive ones are not available.
- Enable Notifications: Turn on notifications to alert selected users when the form is submitted. Notifications can be customized later after saving.
- Form Requires Approval: This changes the status of the form from “Pending” to “Submitted” prompting Administrators to then approve or reject the submitted responses
- Template Form: Mark the form as a template if it can be selected and completed at any time by users through the mobile app or web portal.
- Recurring Form: For forms like daily pre-starts, enable the recurring option and set a schedule (e.g., weekly at 9:30 am).
Step 3: 🏗️ Site Inductions and Assigning Forms
1. If you select Site Induction as the form type in Form Settings, you can set it to auto-assign to users entering specific sites. This ensures the form is completed within 15 minutes after entering the site.
2. Select Active to enable auto-assignment.
3. Filter the form by Sites, Contractors, Users, Industries, or Job Titles to narrow down who should receive the form.
Step 4: 🔔 Set Up Form Notifications & Conditions
1. Once your form is saved, the Form Notifications tab becomes available. Here, you can select users to receive notifications when the form is submitted.
2. Additionally, you can set you can set the form into a Category or create a New Category when needed
3. After configuring your settings and notifications, click Save to apply all changes.
❓ Troubleshooting
If the form does not appear in the list or is not working as expected:
- Ensure that the form is Active.
- Double-check the notification settings after saving the form.
📞 Need Help?
If you need further assistance, please contact our support team at:
📧 Email: support@take5connect.com
📞 Phone (NZ): 0800 582 535