How Can We Help?
-
Account
- 👨💼 How to Change Your Username, Email, Password and Employer
- 🧑💼Download the Mobile App (Google Play Store and Apple App Store)
- 🧑💼 How to Enable or Disable Automatic Sign-Outs for Your Sites
- 🧑💼 How to Make Someone Your Main Contact
- 🧑💼 How to Add a Company Logo to Your Account
- 🧑💼 How to Enable or Disable Notifications
-
Charts & Graphs
- 📊 How to Create and Manage Dashboard Charts
- 📊 How to Create and Manage Charts & Graphs
- 📊 How to Access and Manage Sites Charts & Graphs
- 📊 How to Access and Manage Account Inductions Charts & Graphs
- 📊 How to Access and Manage Incidents Charts & Graphs
- 📊 How to Access and Manage Tasks Charts & Graphs
- 📊 How to Access and Manage Safety Observation Charts & Graphs
- 📊 How to Access and Manage Form Charts & Graphs
- 📊 How to Access and Manage Hazards & Risks Charts & Graphs
- 📊 How to Access and Manage Audits & Inspections Charts & Graphs
- 📊 How to Access and Manage Toolbox Talk Charts & Graphs
- 📊 How to Access and Manage Site Activity Charts & Graphs
- 📊 Understanding Chart Descriptions
- 📊 How to Access and Manage Messages Charts & Graphs
-
Contractors
-
Digital Signatures
-
Employees
- 👷♀️How to Add Employees as Managers of Sites
- 👷♀️How to Add and Manage Employees
- 👷♀️How to Import and Export Employee Details
- 👷♀️How to Add Training & Competency Details and Certificates to an Employee's Profile
- 👷♀️Unlocking a User After Multiple Failed Login Attempts
- 👷♀️Accessing User Profiles
-
Form Builder
- 📋 How to Use Form Categories
- 📋 How to Set Up Reoccurring Forms
- 📋 How to View and Link Forms to Sites
- 📋 All About Form Settings
- 📋 Setting Up Form Notifications
- 📋 Exporting Forms
- 📋 Assigning Forms
- 📋 Creating Forms and Inductions
- 📋 Approving, Rejecting Form Responses, and Viewing Audit Logs
- 📋 Adding Images and Videos into Forms and Inductions
- 📋 Viewing, Assigning, and Unassigning Forms
- 📋 Adding Display Conditions to Forms
- 📋Completing Forms and selecting Form Templates
- 📋How Forms are typically processed
-
Hazards/Risks
-
Incidents
-
Inductions
-
Inspections/Audits
-
Messages
-
My Pre-Qualifications
-
TA/JSA/SWMS
-
Tasks
-
Templates
-
Reporting
-
Sites and Subsites
-
Safety Observations
-
Take5™️ Connect Mobile App
- 📱 How to Report a Hazard or Risk via the Mobile App
- 📱 How to Enable or Disable GPS Tracking in the Mobile App
- 📱 How to Add Training/Competency Documents to Your Profile in the Mobile App
- 📱 How to Enable and Disable Notifications in the Mobile App
- 📱 How to Access the Admin Menu in the Mobile App
- 📱 How to Add Multiple Files in the Mobile App
- 📱 How to Sign Into the Mobile App
- 📱 How to Create a Toolbox Talk in the Mobile App
- 📱 How to Access Your Inductions in the Mobile App
- 📱 How to Complete a Task Assigned to You in the Mobile App
- 📱 How to Create a Task in the Mobile App
- 📱 How to Complete Approved Work from a Form in the Mobile App
- 📱 How to Select a Form Template in the Mobile App
- 📱 How to Complete Forms via the Mobile App
- 📱 How to Report a Safety Observation in the Mobile App
- 📱 How to Report an Incident through the Mobile App
- 📱 How to Conduct an Audit through the Mobile App
- 📱 How to Use Geofencing in the Mobile App
- 📱 Geofencing: Philosophy of Operations in Take5™️ Connect
- 📱 Troubleshooting GPS Issues in the Mobile App
- 📱 How to Sign Into a Site via QR Codes in the Mobile App
- 📱 Why Take5™️ Connect Requires Background Location Access
- 📱 How to Delete Your User Profile in the Mobile App
- 📱 How to Update Your Login Credentials and Employer in the Mobile App
- 📱 How to Download and Set Up the Take5™️Connect Mobile App
- 📱 How to Complete the Daily Site Hazard & Noticeboard Message Acknowledgment
- 📱 How to Manually Sign Out of a Site in Mobile App
- 📱How to Create a Toolbox Talk Using Templates in Take5™ Connect (via Mobile App)
- 📱 How to Add Snippets to a Toolbox Talk in the Take5™ Connect Mobile App
- Show Remaining Articles (14) Collapse Articles
-
Sites
- 🏢 How to Create a Site
- 🏢 How to Clone a Site
- 🏢 How to List, Remove or Archive Sites
- 🏢 Emergency Evacuation Plans
- 🏢 How to Add a Noticeboard Message to a Site
- 🏢 How to Add & Remove a Document to a Site
- 🏢 Managing Site Toolbox Talks
- 🏢 How to Create, Update, Print, or Delete QR Codes
- 🏢 How to Claim a QR Code
- 🏢 How to Scan a QR Code Using Your Phone Camera
- 🏢 How to Create a QR Code for a Site or Multiple Sites
- 🏢 How to Manage Task Analysis Documents for Existing Sites
-
Safety Plans
-
Notifications
< All Topics
Print
🖊️ How to Use Digital Signatures
PostedMay 1, 2025
UpdatedJune 13, 2025
ByAmie
Digital signatures in Take5™ Connect provide a secure and efficient way to sign forms and documents electronically. This guide will walk you through enabling and using digital signatures in the platform. 👇
Step 1: 📄 Enabling Digital Signatures for Forms
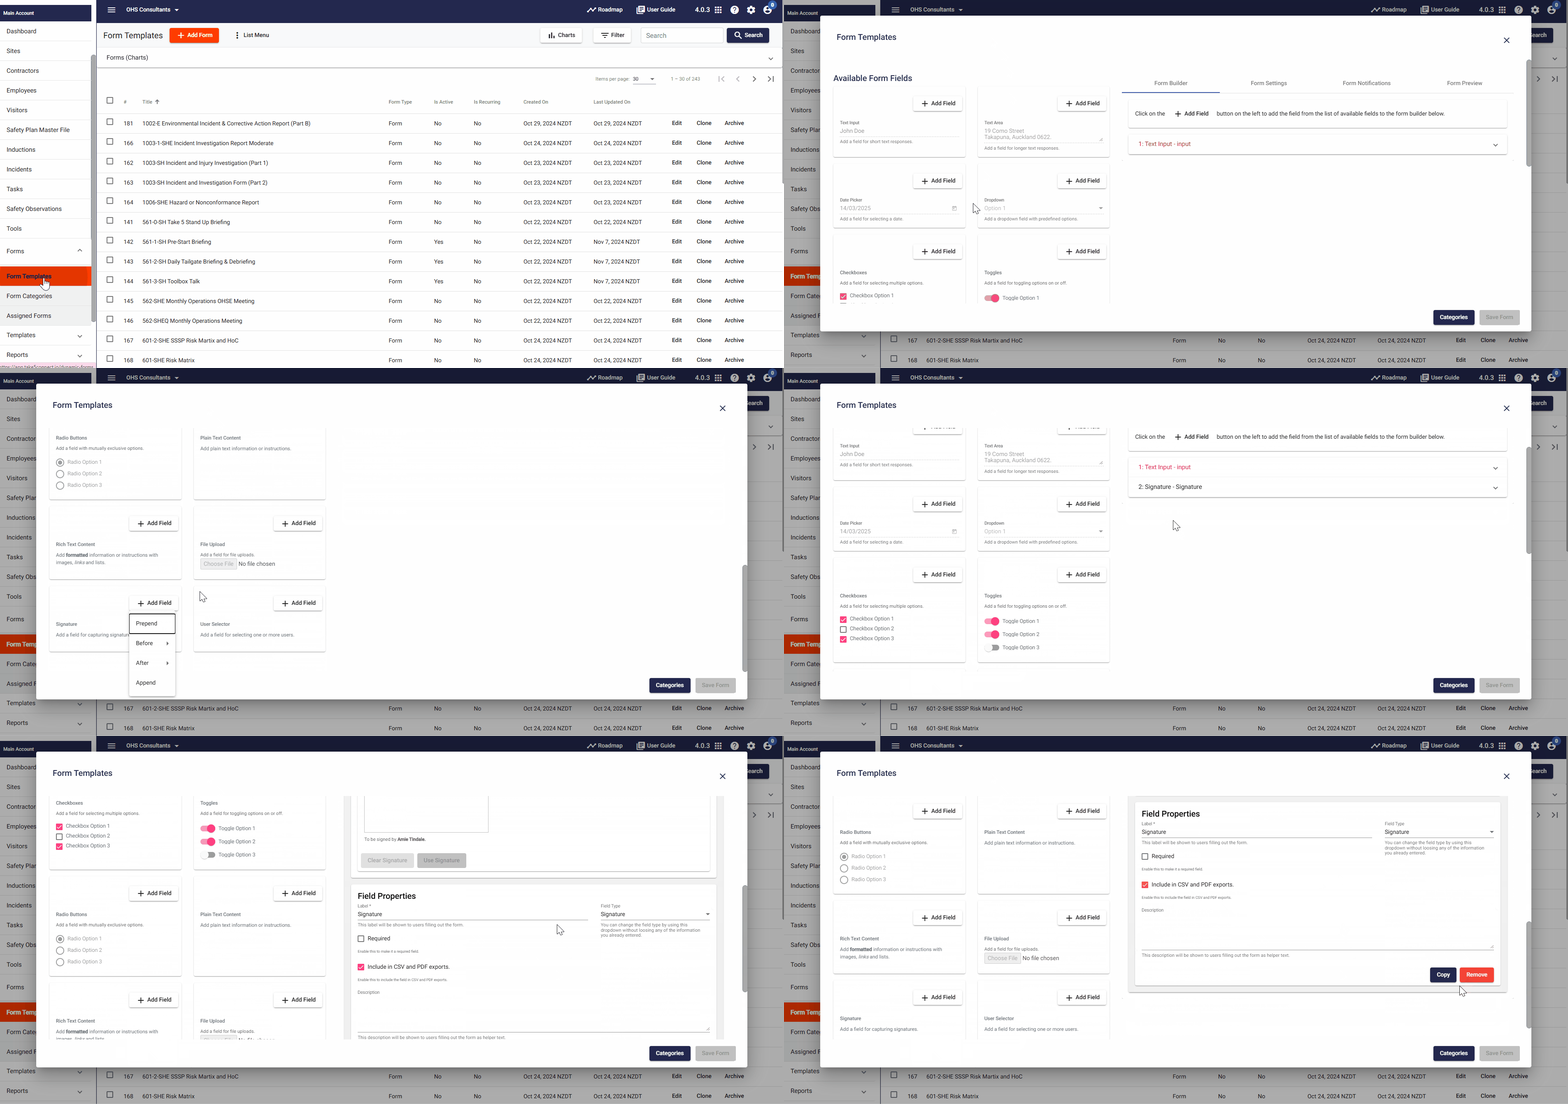
- Navigate to the Forms section in the left-hand menu.
- Select Form Templates from the drop down menu to create or edit a form.
- Click Add Form in the top left corner, then click the Form Builder tab
- Drag and drop the Digital Signature field from the left hand side into the form.
- Configure signature requirements, such as required fields or field type.
- Click Save to apply the changes.

Step 2: ✍️ Signing a Form Digitally
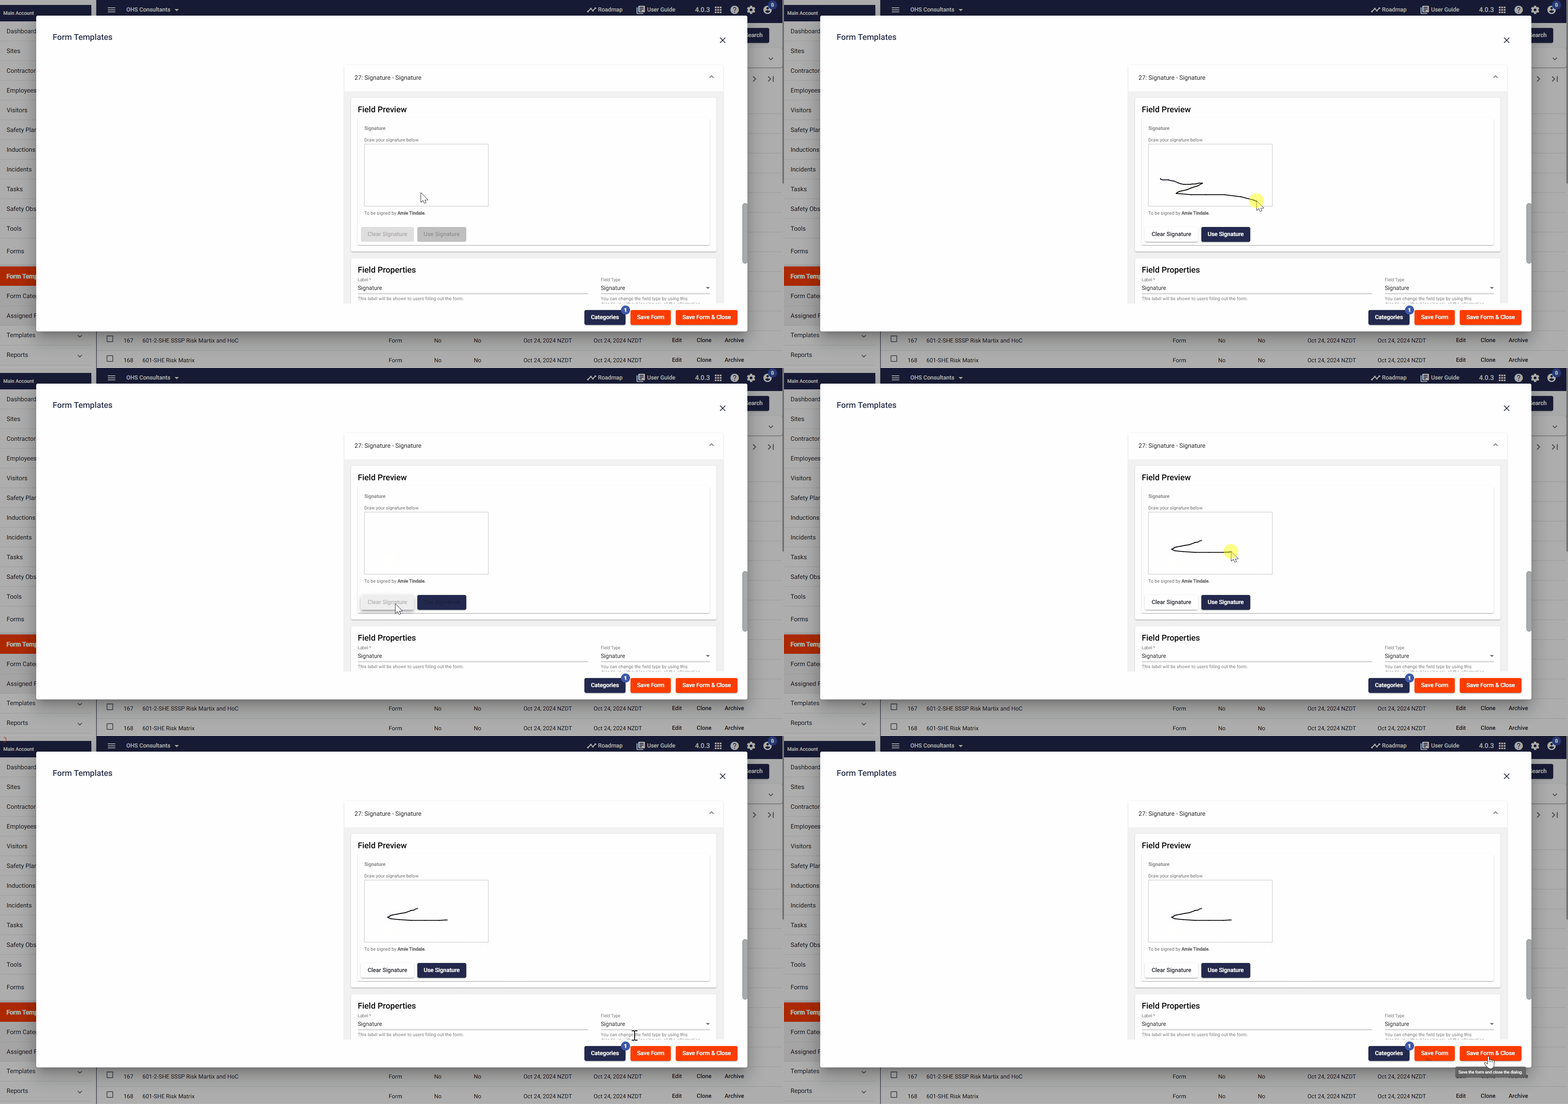
- Open a form that requires a signature.
- Click on the Digital Signature field.
- Use a touchscreen, mouse, or stylus to sign the form.
- Click Save to finalize the signature.

Step 3: 🔄 Reviewing Signed Documents
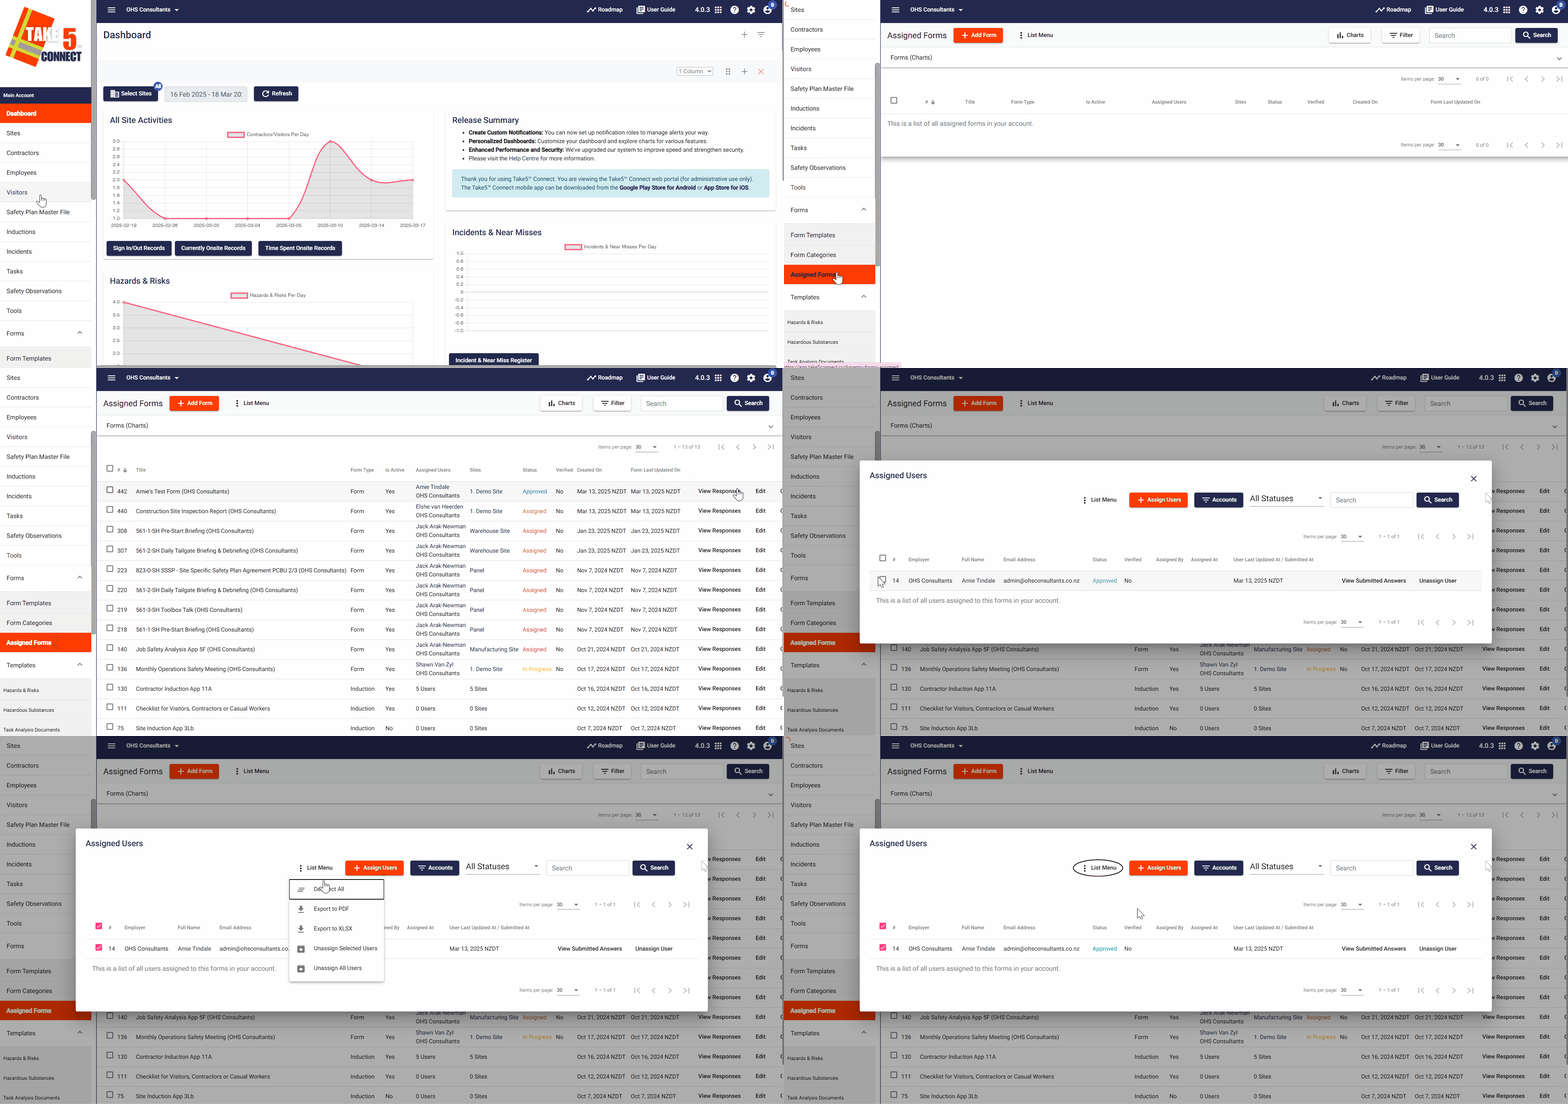
- Navigate to the Assigned Forms section in the drop down menu under Forms.
- Select View Responses next to a form to see the results.
- Click Export from the drag down menu under List Menu if a hard copy is needed.

Step 4: 🛠️ Completing The Form on the Mobile App
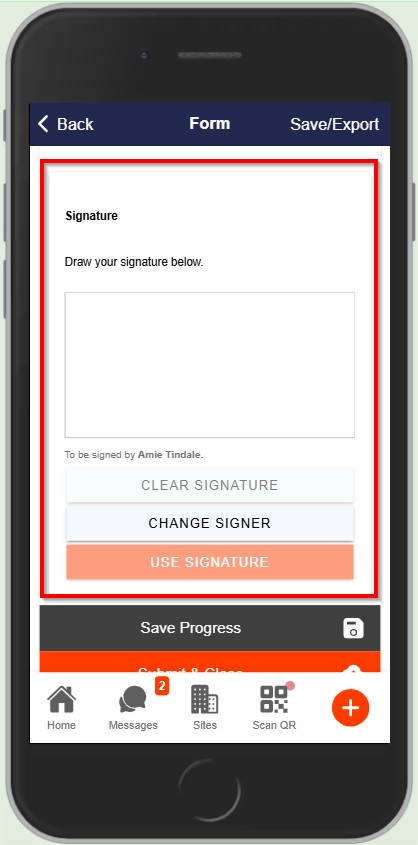
- When completing the form on the mobile app, the signature box will appear at the bottom.
- Users are able to draw their signature.
- There are then options to either Clear Signature, Change Signer or Use Signature
- Once filled, Submit & Close the form.

❓ Troubleshooting
- If the signature field is missing, ensure it has been added in the Form Builder.
- If a signature does not save, check your internet connection and try again.
- If a signed form does not appear in Completed Forms, refresh the page or check user permissions.
📞 Need Help?
If you need further assistance, please contact our support team:
📧 Email: support@take5connect.com
📞 Phone (NZ): 0800 582 535
